Classic Mosaic converts any image into a realistic tiled mosaic. Classic Mosaic is particularly effective because of it’s edge detecting features. Tiles align themselves to curved shapes, such as the outlines of a face, to simulate the visual characteristics of ancient Greek mosaics. Classic Mosaic is an extremely simple filter to operate. In most cases, you’ll run it on an entire image; so a selection isn’t even necessary.
To get great results with Classic Mosaic, choose images to be used with the filter wisely. Here are some guidelines for choosing an image that will work well with Classic Mosaic:
Now that you’ve chosen the right image, Classic Mosaic is a snap:
Controls the size of the tiles that compose your mosaic. Higher values yield larger tiles.
Specifies the width of the space between tiles, relative to the tile size. Larger values increase the spacing between tiles.


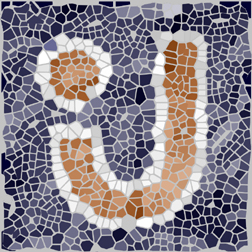
First image above: Grout Width 20.
Second image: Grout Width 75
Higher values forces the tiles to follow the details of an image more closely.
Grout can be any color you like. Clicking in this box awakens your slumbering color picker.
Controls the random element in the creation of this effect. Minor changes in the Random Seed setting can produce dramatic changes in your image; we encourage you to experiment with this control until you find the effects you like best. You can then precisely duplicate the effect by saving the Random Seed setting.
![]() Use
the contrast adjustment tools in your graphics host to strengthen contrast levels
in your image. This practice helps Classic Mosaic detect and place tiles along
edges more accurately.
Use
the contrast adjustment tools in your graphics host to strengthen contrast levels
in your image. This practice helps Classic Mosaic detect and place tiles along
edges more accurately.
![]() Crumple your image before running Classic Mosaic to add interesting variations
to the colors and shape of tiles.
Crumple your image before running Classic Mosaic to add interesting variations
to the colors and shape of tiles.