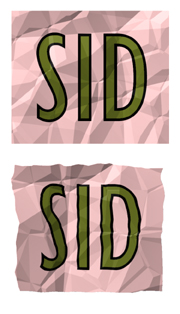

Crumple simulates the result of balling up of a flat object, such as a piece of paper, and then flattening it back out. Crumple works great on entire images and discrete objects, such as text.
Controls the size of the creases in the crumpled paper.
Low values crumple the image less; higher values wrinkle the selection more. Note that highly crumpled paper, combined with Distort Image covers less projected area than the original image.
Select the Distort Image checkbox to make your image adhere to the surface contours created by the crumple effect. When this checkbox is cleared, Crumple creates highlights and shading that do not affect the original image. This option also causes the edges of your selection to be drawn in. This space can either be transparent or filled with a solid color.

The uppermost image is crumpled with the Distort Image option
disabled. In the lower image, Distort Image is enabled.
Select the Seamless Tile checkbox to create a crumpled rectangle that can be tiled with no seams. Selecting Seamless Tile disables Distort Image.
Chooses the solid color that fills in where the effect does not cover the original image. This is only enabled in the background layer. In layers that have transparency, the area around the effect is simply erased.
Controls the random element in the creation of this effect. Minor changes in the Random Seed setting can produce dramatic changes in your image; we encourage you to experiment with this control until you find the effects you like best. You can then precisely duplicate the effect by saving the Random Seed setting.
Controls the direction from which the light falls on your selection. Click and drag within the lighting control box to change the direction, or enter a numerical value between 0 and 360 degrees.
Controls the angle formed by the light and the page. Click and drag within the lighting control box to change the inclination, or enter a numerical value between 45 and 90 degrees.
Controls the intensity of the shiny highlights appearing on areas facing the light.
Controls the size of the shiny highlights on areas facing the light; higher values yield larger highlights.
Use the color picker to choose any color for the shiny highlights.
Increases the overall brightness of the image to compensate for any darkening due to lighting calculations.